![Unity(ユニティ)プログラミングに必要はエディタのインストール[設定・連携]](https://rokoroko-zakkibrog.com/wp-content/uploads/2021/10/unity-editor.webp)
こんな疑問を解消します
この記事の内容
- Unityでプログラミングをするにはプログラムを書くエディタが必要
- Unity がサポートしている統合開発環境(IDE) Visual Studioというエディタがおすすめ
- Visual Studio は Unity との設定や連携が簡単
- Visual Studio Community 2019 のインストール方法・設定・連携
プログラムを書くにはエディターというプログラムを書くのに適したツールを使います。
メモ帳とかに書いてもいいんですが、連携、デバッグ(間違えたところを直すこと)がやりずらいです。
エディターを使えば、間違えた行数や何がいけないのかを教えてくれます。
まだインストールをしていない方は先にこちらの記事をご覧ください
Unity(ユニティ)の記事はこちら!
☑ Unityでゲーム開発を学習するならアンズテック!
Visual Studio Community 2019エディタのインストール方法
Unity Hub のショートカット
デスクトップの「Unity Hub」ショートカットアイコンをクリックする

Unity Hub モジュールのインストール画面
Unity Hub ツールが起動するので、点3つのアイコンをクリック
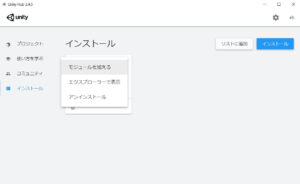
Unity Hub 「モジュールを加える」を選択
モジュールを加えるをクリック
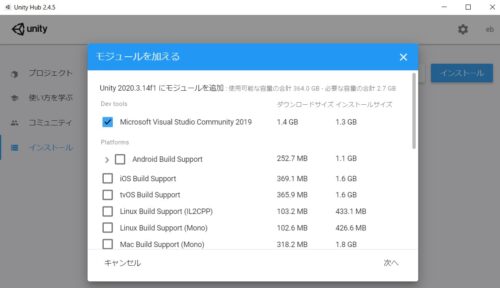
Unity HubでMicrosoft Visual Studio Community 2019モジュールを加える
「Microsoft Visual Studio Community 2019」にチェックを入れ、「次へ」をクリック
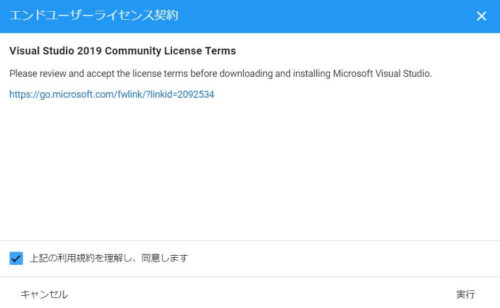
エンドユーザライセンス契約に同意する
利用規約をよく読み、規約に同意して「実行」
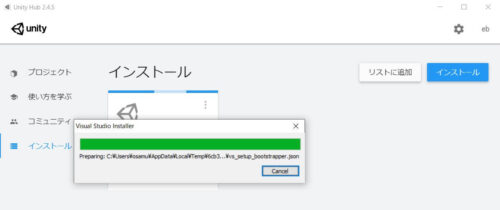
Microsoft Visual Studio Community 2019インストール中
インストールされるのを待ちます
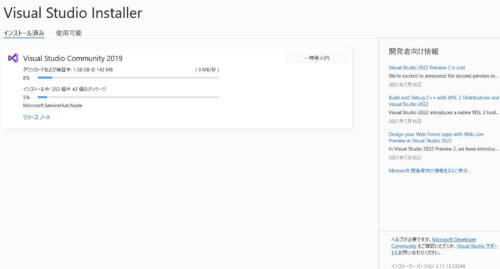
Microsoft Visual Studio Community 2019 インストーラー
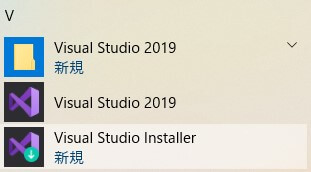
Windows メニューVisual Studio Installer
Windows のメニューに追加されるので、もう一度 Visual Studio Installer を起動します
メニューに出てこない場合は一度パソコン(PC)の再起動をしてください
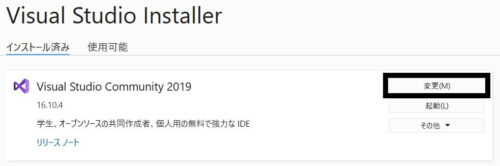
Visual Studio Installer 変更
「変更(M)」をクリック
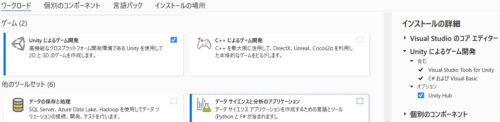
Unityによるゲーム開発環境に変更
「Unityによるゲーム開発」にチェックを入れ、「変更(M)」をクリック
参考URL

→Visual Studio 向けの Unity のサポートをインストールする
Unity と Visual Studio Community2019エディタ の連携・設定
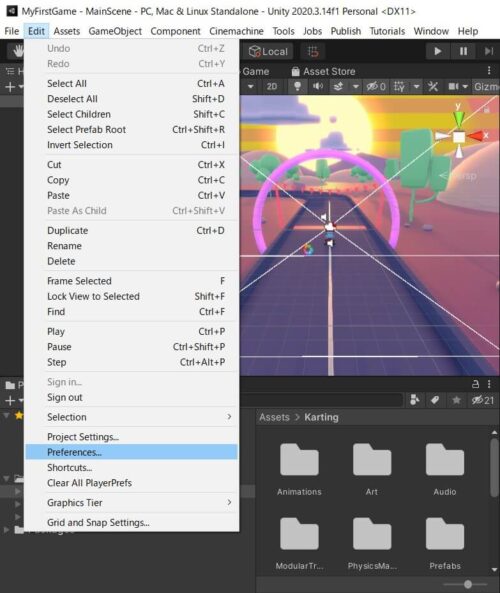
Unity設定変更画面
Unity のプロジェクトを起動し、「Edit」→「Preferences」をクリックします
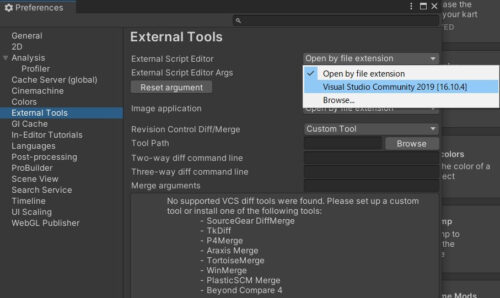
Visual Studio Community 2019 連携
「External Tool」→「Open by file extension」→「Visual Studio Community 2019」を選択します
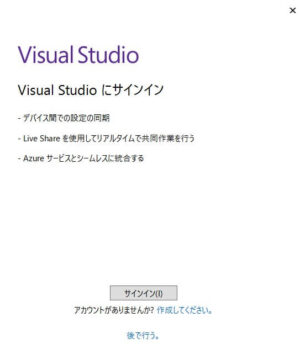
VisualStudioにサインイン
VisualStudioにサインインと表示されますが、アカウントの作成は試しに使う分には必要ありませんので、「後で行う。」をクリック
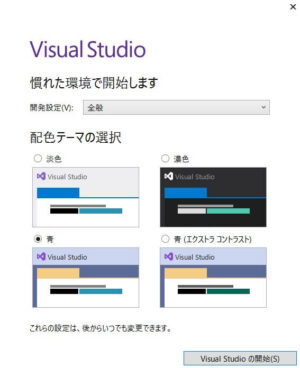
VisualStudioのエディターの色決め
VisualStudioのエディターの色を決めます(好みで選んでください)
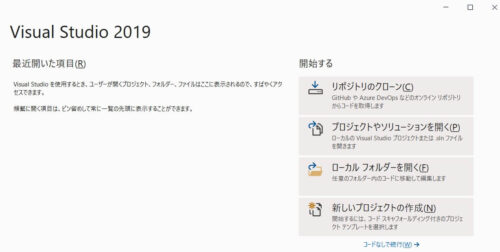
VisualStudio2019
この画面が出たら終了です
画面を閉じてください
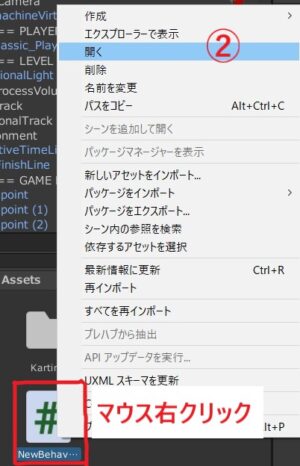
C#のスクリプトを開く
設定を反映させるため、一度VisualStudioを終了させて、もう一度起動します
その後、C#のスクリプトで「右クリック」→「開く」でスクリプトが表示されればOKです
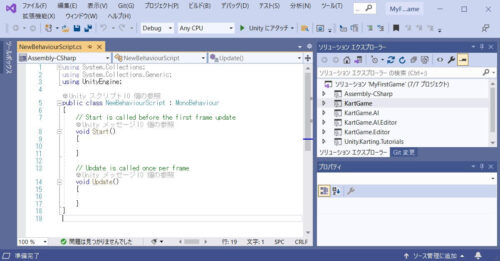
C#スクリプト表示
VisualStudioでC#のスクリプトが表示されました
参考URL
→Visual Studio を使用するように Unity を構成する
【注意】30日の試用期間が過ぎるとMicrosoft アカウントでサインインしないと使えなくなる
Visual Studio Community 2019 は個人利用であれば無料で使用できます
しかし、インストールから30日の試用期間が過ぎるとMicrosoft アカウントでサインインしライセンスの認証が必要となるので、サインインします
また、忘れたころに定期的にサインインを求められる場合があるので、定期的にサインインしてください
1. インストールと使用権。
a. 個人ライセンス。お客様は、販売またはその他の目的でお客様独自のアプリケーションを開発している個人である場合、本ソフトウェアを使用して、当該アプリケーションを開発およびテストすることができます。
引用:マイクロソフト ソフトウェア ライセンス条項 MICROSOFT VISUAL STUDIO COMMUNITY 2019
【Unity】Visual Studio Community2019エディタのインストール・設定・連携まとめ
Unity でプログラミングするには VisualStudio のインストールがおすすめです
- UnityHub より VisualStudio のモジュール追加
- Visual Studio Installer で「Unityによるゲーム開発」をインストール
- Unity と Visual Studio の連携・設定
これでやっとゲームを制作することができるのね
でも、ちょっとまって!
英語表記で全然わからないわよー
英語もプログラムもわからないんじゃ嫌よ
安心してください
Unity には日本語パッケージがあります
全てが日本語になるわけではないですが、初心者の方は日本語パッケージを使った方が抵抗なく始められると思います
Unity を日本語化するにはこちらをご参照ください
Unity(ユニティ)の記事はこちら!
☑ Unity でプログラミングをもっと勉強したいならアンズテック!